
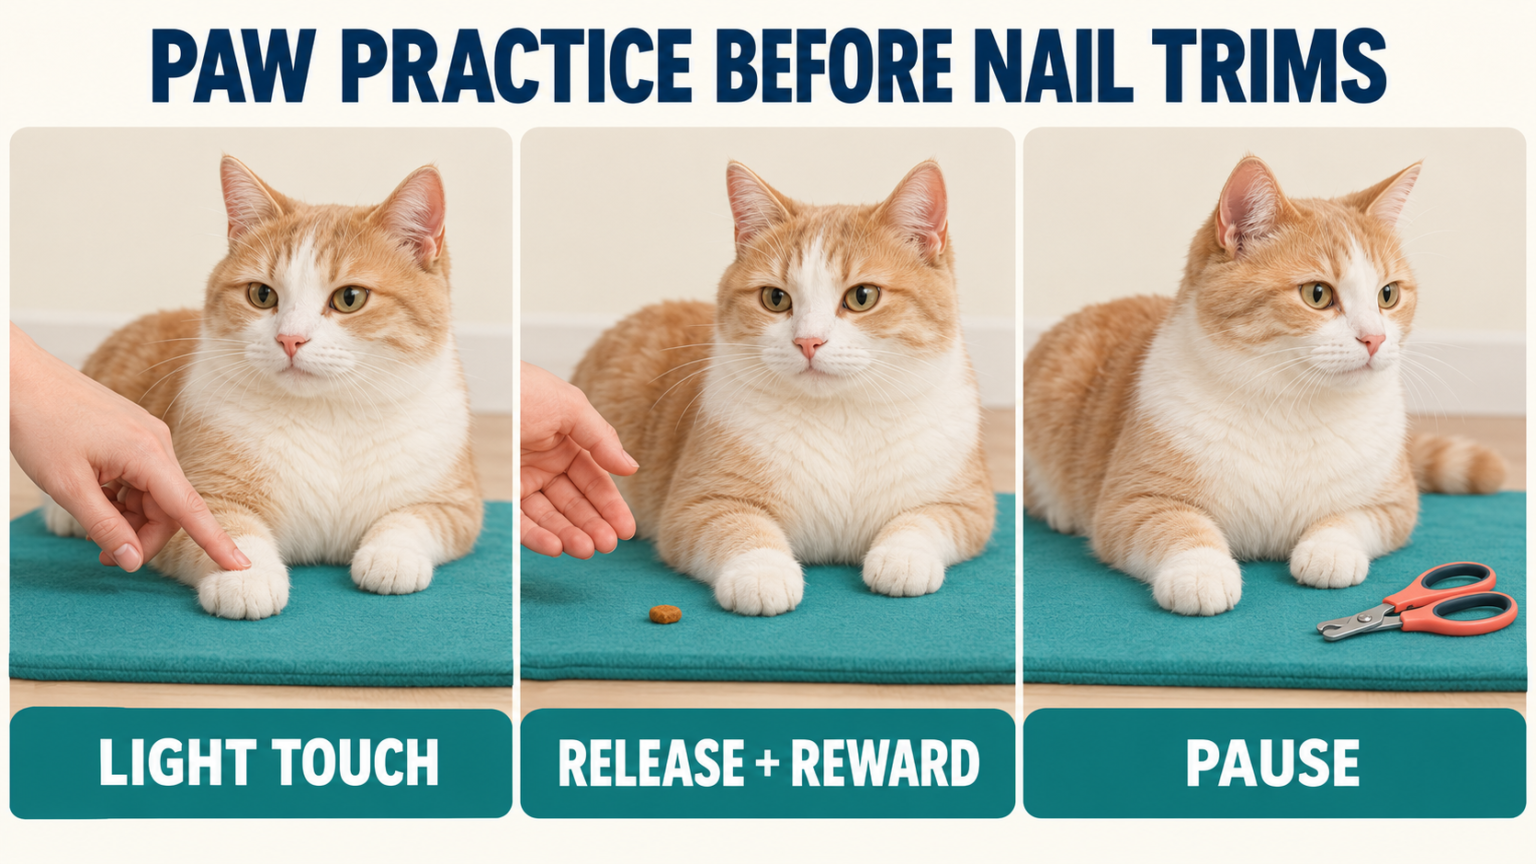
The difficult part of a nail trim is often getting close to a paw. A cat may happily sit beside you, then tuck their feet away as soon as your hand moves toward them. Reaching for the clippers at that point adds another task to an interaction they already find uncomfortable.
For a healthy cat whose claws do not need urgent attention, separate practice from trimming. Start with contact they can comfortably accept, release it, and offer a small reward. A session that ends without cutting a nail can still be useful preparation.
Quick Answer
- Check whether the claw or toe looks injured. A painful or ingrown claw needs a veterinary assessment.
- Start with a touch your cat accepts. Briefly touch the paw and release it before introducing clippers.
- Let go if the cat pulls away. A practice session can end without trimming a nail.
What You’ll Need
A quiet surface and the clippers kept aside until the cat is comfortable.
1. First decide whether this can wait
A claw growing toward or into the pad, a broken claw, limping, swelling, or a sore paw needs veterinary advice. Do not wait for a training plan to solve it, or try to pull out an embedded claw. PDSA’s home health-check guidance recommends contacting your vet about broken or overlong claws, limping and sore patches.
Also arrange a check if your cat suddenly objects to handling they previously accepted. Pain can change how a cat responds to touch. FelineVMA’s pain guidance explains why changes in behaviour matter, even when a cat is not crying out.
Ask the veterinary team whether your particular cat needs trimming and how often to check. Lifestyle, activity and claw growth vary. An older cat may need closer attention; there is no useful one-size-fits-all calendar for every cat.
2. Set up a practice session with no trimming target
Choose a quiet moment and a stable, comfortable spot your cat already uses. Keep other pets away. Let your cat settle in a natural upright or resting position; you do not need to turn them onto their back or lift them onto a high surface.
TailSprig Living · Amazon Idea List
My recommendations for cat grooming tools
The cat grooming collection includes small cat nail clippers and soft brushes for separate coat-care sessions. Paw-handling practice starts with the clippers put away. Ask a veterinary professional to demonstrate where the clear tip ends before you trim.
Affiliate link. As an Amazon Associate I earn from qualifying purchases.
See cat grooming tools on AmazonHave a few tiny pieces of familiar, suitable food ready. Keep them within easy reach so you can release a paw before offering a reward. If your cat has a prescribed diet, ask the vet what to use. Do not skip a meal to make your cat cooperate.
Leave the clippers aside for the first handling exercises. The FelineVMA cooperative-care guidance recommends voluntary participation and practising only when the cat is healthy, comfortable and not showing fear. If your cat leaves, let them.
3. Work from comfortable touch toward one claw
Use the following ladder as separate exercises, not a checklist to finish today. Begin at the easiest step your cat accepts. Progress depends on their response; these are not timed stages with a deadline.
- Start with familiar touch. Briefly stroke an area your cat enjoys, such as a cheek or shoulder. Stop touching and offer a small reward. If even this is unwelcome, leave paw practice for another time.
- Approach the leg gradually. On a later comfortable attempt, move your hand a little closer to the foreleg. Touch briefly, withdraw your hand and reward. Do not slide straight down to the foot if the smaller movement already makes your cat tense.
- Try a light paw touch. Touch the outside of one paw without gripping it. Release and reward. If your cat retracts the paw, do not follow it or hold it tighter; make the next attempt shorter or return to the leg.
- Practise brief support. Once light touch is comfortable, gently support the paw for a moment without lifting it far from its resting position. Release before offering the reward. A helper may offer food, but should not pin the cat in place.
- Reveal one claw only when ready. With gentle pressure on a toe, briefly extend a claw, then release and reward. Do not cut yet. Ask your veterinary team to demonstrate the hand position if you are unsure.
These small handling steps build on Fear Free’s nail-trim preparation. Its useful principle is gradual practice, rather than pushing through a full trim. You need not use suggested restraint garments, unfamiliar foods or a fixed trimming interval to follow that principle.
4. Introduce the clippers separately
Let your cat see the closed clippers at a comfortable distance, with no reaching for a paw. Offer a reward, then put them away. Later, gently open and close them away from the cat. If the sight or sound causes concern, increase the distance or stop.
Seeing a tool comfortably does not mean your cat is ready for it to touch a claw. Keep tool practice and paw practice separate until both are manageable. VCA’s nail-trim guide describes starting with handling alone and building toward a single nail instead of completing every claw at once.
Choose a tool you can control and see past
Use a feline nail trimmer with a cutting area small enough that you can see the claw clearly. Check that the blades, pivot and handles are intact and that you can open and close it comfortably. A tool that obscures the tip or is awkward in your hand makes the task harder.
FelineVMA’s nail-trimming advice recommends suitable small trimmers and a veterinary demonstration. If your current cat trimmer is comfortable to hold and in good condition, a new purchase may be unnecessary.
If you already own the Safari Cat Deluxe Nail Trimmer pictured below, the manufacturer’s product page shows its scissor-style finger opening. Check that the handle fits your hand and the blade leaves the claw tip in view. If your cat pulls away, put the clippers down.
The product card below contains affiliate links.

Trim one tip only when both of you are ready
You need a steady view, comfortable paw handling and confidence about where to cut. If any of those is missing, ask your veterinary nurse or vet for a demonstration. Do not use a moving, struggling cat as an opportunity to practise your cutting technique.
In a pale claw, identify the pink quick: it contains blood vessels and nerves. Cut only the small sharp tip beyond it, leaving a clear margin. PDSA’s claw guide explains that cutting the quick causes pain and bleeding. If you cannot confidently distinguish the safe tip, do not guess.
Release the paw, reward your cat and stop after that first nail. Do not turn an easy first cut into a race to finish the paw. On another occasion you may manage another nail, or return to handling practice. Keep track of which claw was trimmed rather than repeatedly shortening the same one.
If a claw bleeds, stop the trim and contact your veterinary team for advice, especially if bleeding continues or your cat seems painful. Do not continue cutting the other claws while trying to manage an injury.
Read the response, not the number of nails
| What you notice | What to do next |
|---|---|
| Loose posture, brief touch accepted, paw stays available | Repeat the easy step; consider one small progression on another comfortable attempt. |
| Paw pulled back, body stiffens, ears turn back or tail begins lashing | Release and pause. Next time make the contact shorter, lighter or farther from the paw. |
| Hissing, swatting, biting, frantic escape or unusually frozen posture | End the session. Seek help rather than increasing restraint. |
| Pain, swelling, limping, broken claw or claw pressing into the pad | Contact the veterinary team; do not delay needed care for training. |
A still cat is not necessarily a relaxed cat. The 2022 AAFP/ISFM handling guidelines recognise freezing and avoidance as important responses and advise against heavy restraint and scruffing. Do not use scruff clips, DIY hanging slings or a tight wrap to defeat resistance.
When at-home practice is not enough
Tell the veterinary team exactly where the difficulty begins: approaching the leg, touching the paw, extending a claw, or seeing the clippers. That is more useful than saying your cat is simply difficult. Ask for a handling demonstration and a plan that covers any nails needing attention now.
A towel or extra helper is not automatically a solution. If your cat fights the setup, stop and ask for professional help. Medication decisions belong to your veterinarian; do not use human sedatives or a forum dose.
If getting to the clinic is part of the problem, work separately on cat carrier training. For coat care, use the different steps in our reluctant-cat brushing guide. Neither exercise replaces needed claw care.
Keep scratching choices available
Trimming tips does not remove a cat’s need to scratch. Provide suitable scratching surfaces and continue to reward their use. FelineVMA’s claw guidance explains that scratching supports normal stretching, marking and claw maintenance. Our sofa-scratching guide covers choosing and placing alternatives.
Keep the next practice small enough that you can observe what happens and stop comfortably. The useful question is not whether you finished all the nails. It is whether your cat could participate without fear or pain, and whether any claws needing prompt care have been checked by the right person.
Printable checklist
Cat paw handling checklist
- Start with contact the cat already accepts.
- Work toward a brief paw touch and release.
- Introduce the clippers as a separate step.
- Ask the vet about painful or injured toes before trimming.
- Leave trimming for a separate session if the cat withdraws or the tip is hard to see.
Frequently asked questions
Do I have to trim a nail during practice?
A session can end after a comfortable touch and release.
When should the clippers appear?
Introduce them separately from holding the paw, before trying a trim.
What if my cat pulls the paw away?
Let go and try an easier step another time.
Who should check a painful toe?
A veterinarian should assess pain or injury before the next practice session.
Leave a Reply