
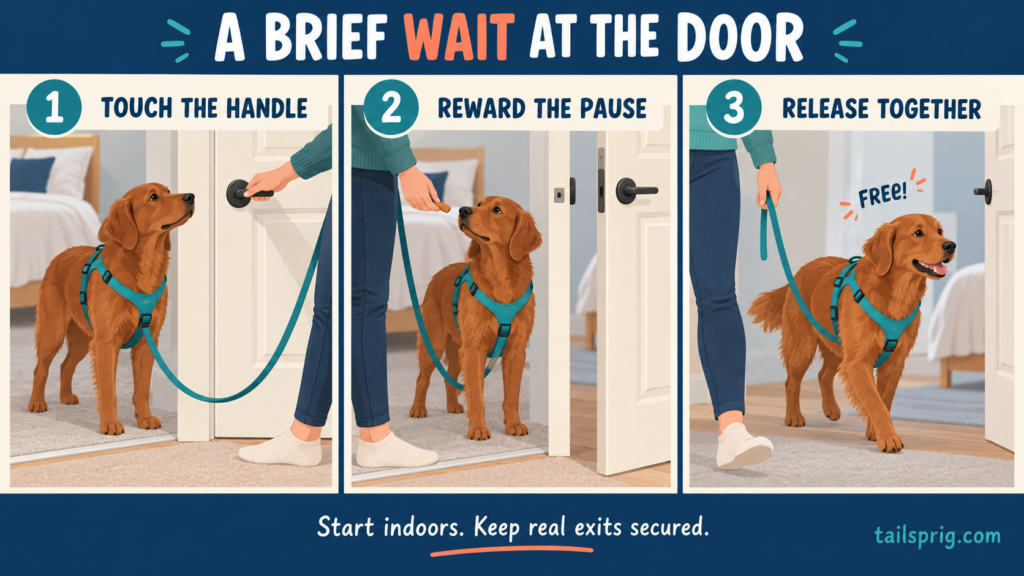
A small handle movement, a rewarded pause and a release through an interior doorway. AI-generated educational illustration.
Your dog stays still until you reach for the handle. Then the front paws lift, the lead tightens and the pause disappears. The handle movement may be the part that needs practice, rather than a longer or louder “wait.”
To teach your dog to wait at the door, begin at a quiet interior doorway. Reward a brief pause, introduce the opening in small stages and use a separate word to invite them through. Keep real exits physically secured while you teach; a learned cue cannot guarantee that a dog will stay inside.
Separate practice from a real exit
Choose a doorway between rooms, with exterior doors closed and other pets out of the practice area. Use your dog’s familiar, well-fitting harness and lead. Hold the lead loosely, with enough room for comfortable standing, while keeping the exercise under your control. Our harness-fit guide covers checking fit without assuming that one rule suits every dog.
A delivery, an urgent toilet trip or a busy shared hallway is a poor first lesson. Plan those exits separately. For arrivals, arrange a comfortable, secure space away from the entrance before opening it. A barrier must actually suit your dog; a gate they can climb or knock over is not reliable containment. Battersea’s visitor guidance explains the value of keeping immediate front-door access separate from training.
Do not leave a lead attached to an unattended dog. Keep the doorway clear of paws, noses and the lead before moving the door.
Decide what “wait” will mean
For this exercise, “wait” means pause before crossing the threshold. Standing is fine; you do not need to insist on a sit or make the dog hold one posture. “Free” or another consistent release word means they may move through with you.
The distinction matters when a dog thinks receiving a treat means the exercise has ended. A reward acknowledges the pause; the release word gives permission to move forward. Best Friends describes this brief wait-and-release behavior.
Get the first repetition ready
- Pick a quiet time when your dog can notice you. If the entrance already has them pulling or jumping, choose a less exciting room.
- Have a few small, familiar rewards ready before approaching the door. Use food your dog can have as part of their usual daily allowance.
- Keep your reward hand on the dog’s side of the threshold. Avoid drawing them forward through the opening to collect it.
- Choose one release word that everyone practising will use. Keep early sessions short enough that you can finish with an easy repetition.
Dogs Trust’s doorway guide starts with calm behavior, then handle movement and a small opening. The following sequence adds a clear verbal pause and release; you can teach the parts separately.
Teach the pause in five small steps
- Reward beside the closed door. Stand a comfortable distance from it. When all four feet are on the floor and the lead is loose, say your usual marker, such as “yes,” and give a reward. If your dog cannot pause here, move farther away or change doors.
- Touch the handle without opening. Make a small reach. Reward if your dog remains behind the threshold. A reach halfway toward the handle may be enough for the first attempt. Return your hand to your side between repetitions.
- Introduce a tiny opening. Move the door only a little, with the dog well clear of its swing and edge. Reward the brief pause where they are. If they move toward the gap, stop the opening and reset safely; make the next attempt easier.
- Add the pause and release words. Once your dog predictably pauses during an easy repetition, say “wait” just before that familiar handle movement. Reward the pause. Then say “free” and invite them through the interior doorway with you on a loose lead. Use the release before moving together, rather than expecting them to guess.
- Widen the opening gradually. Repeat a width your dog can manage, then try a little more. Do not widen the door, lengthen the pause and step away all at once. Return to an easier version whenever the extra movement draws them forward.
A brief pause can be enough to begin. End the repetition before your dog struggles, then give the release. Every Dog’s wait-cue handout also suggests starting with a less exciting doorway and building the movement gradually.
If a nose or paw reaches the gap, never use the closing door to push it back. Keep the door still, guide your dog away gently and close only when the opening is clear. Avoid slamming, trapping, lead jerks or crowding the dog backward. AVSAB recommends reward-based methods rather than physical corrections.
Practise one change at a time
An easy pause in the bedroom does not show that the same exercise is ready for an apartment entrance. Start smaller at each new door. Keep the lead and secure surroundings in place; do not test the cue beside traffic or by leaving an exterior door open and walking away.
Later, you might change the opening width, wait for a slightly longer pause, or make one small handler movement. Keep the other parts easy. If touching the handle is still difficult, stepping through and disappearing from view is a much bigger task.
Choose a release you can use deliberately. If everyday conversation often includes “okay,” another word may be clearer. Agree on it with the household so one person is not releasing the dog while another is asking them to pause.
When the pause falls apart
They wait until the door moves. Go back to a handle touch, or a smaller movement. Reward before the dog starts forward; repeatedly opening too far gives you fewer useful pauses to reward.
They follow the reward hand. Deliver the reward beside them, behind the threshold. Reset your hand after feeding. Practise the release separately so reaching for food does not become the signal to cross.
They bark, jump or stop engaging. Pause the session and move away from the door. Try a quieter place later. Do not keep repeating the word or extend the wait to make them give in. VCA’s training basics explains how distraction, confusion, fear or discomfort can change a dog’s response.
They pause indoors but rush at visitors. Manage the arrival first. A doorway lesson does not treat fear of strangers. If your dog is persistently tense, growls or seems overwhelmed, seek individual help from a qualified professional who uses reward-based methods.
Keep the everyday plan simple
Practise when nobody needs to get through the door. For real outings, secure your dog first, check the route, then use an easy pause and release together. For toilet breaks, meet the dog’s needs rather than making them wait through a training drill.
The goal is a manageable transition, not proving who goes first. Keep recall practice separate, and use our settle-on-a-mat guide for quiet resting practice. Neither replaces physical control of an open exit.
Optional course for structured practice
Brain Training for Dogs is a paid digital course for owners who prefer guided games and training lessons. Its published curriculum includes an Open Sesame doorway game. You can begin the exercise above without buying a course; compare the current curriculum with how you want to learn.
We have not personally tested this course, and individual results vary. A course does not secure an open exit or replace individual help from a qualified professional when your dog is fearful, guarding, lunging or at risk of biting. Keep the physical-management plan in this guide.
Affiliate disclosure: TailSprig Living may earn a commission if you buy through the link below, at no extra cost to you.